In my last article, I explored why so many organizations are switching from UID, to role-based access control (RBAC) models along with the preparatory process for preparing for this transition. So, the next question becomes: If the use of Roles is convenient for our systems and we’ve done the prep work for the transitioning, what comes next? Here are 5 steps you should follow.
The ACFRPTRX Report
The ACFRPTRX report generator produces a Logonid Access Report showing all rule sets that apply to a specific logonid (LID) mask or user identification string mask.
The ACFRPTRX report gives a detailed overview of user logonid records, their associated permissions, and other related details. Here's a breakdown of its utility and relevance to the process of transitioning to role-based access:
The Cross-Reference Report (ACFRPTXR)
The ACFRPTXR, known as the Cross-Reference Report in ACF2, produces a comprehensive overview of rule entries and their associated resources. When transitioning to a role-based access model, understanding how permissions and resources interplay is crucial. The ACFRPTXR report can assist in various capacities during this transition:
User segmentation is the process of categorizing and subdividing a larger user base into more specific and manageable groups based on shared characteristics, needs, behaviors, or attributes. In the context of IT security and access controls, user segmentation is an indispensable approach that ensures that the right people have the appropriate levels of access to specific resources. By segmenting users, organizations can craft more accurate, efficient, and secure access policies.
Why is User Segmentation Essential?
Grouping Users by Departments
One of the most common and logical ways to segment users is by department. This approach makes sense because, typically, members of a particular department have similar roles and, therefore, similar access needs.
Advantages:
Challenges:
Conducting Surveys or Interviews
To further refine user segmentation and truly understand the access needs of different groups, conducting surveys or interviews can be invaluable. This approach helps gather insights directly from the users.
Advantages:
Challenges:
User segmentation, whether by departmental grouping or refined through surveys and interviews, is a cornerstone of crafting robust and efficient access controls. In an era where data breaches are frequent and costly, ensuring that users have the right level of access—not too much and not too little—is not just a matter of efficiency but of security. Engaging users in the process, understanding their needs, and tailoring access controls to suit those needs can help strike the right balance.
The process of Model Role Creation is an essential component of Role-Based Access Control (RBAC). Instead of assigning permissions directly to individual users, permissions are assigned to roles, and users are then assigned to these roles. This approach centralizes permissions management and makes it more scalable and maintainable.
Based on the segmentation and access analysis, define model roles that represent common permission sets. For example, an "accountant role" might have access to certain financial datasets.
Not every user will fit perfectly into a model role, but the idea is to cover as many users as possible with these roles.
Data Owners are often in a position to accurately identify and define the different roles that need to be established within a role-based access control model, ensuring that each role has the appropriate level of access to perform their job functions without compromising security or compliance.
Data owners typically understand the nature and sensitivity of the data they oversee. They can define who needs access to what data and at which permission levels and can assist in segregating users based on their data access needs, which is critical in the development of roles and permissions within ACF2.
Here are some of the more technical roles related to the mainframe infrastructure.
Mainframe System Administrator:
Mainframe Security Administrator:
Database Administrator (DBA):
Application Developer:
Batch Job Scheduler:
Transaction Processing Specialist:
Storage Administrator:
Mainframe Network Engineer:
Audit and Compliance Officer:
Once roles are defined and users are segmented, data owners can validate whether the permissions granted align with the requirements of each role and ensure that there are no excessive permissions or access limitations.
The transition to a role-based system, especially in complex environments such as mainframes, should be approached with caution and careful planning. Implementing a gradual transition is a sound strategy to ensure that the new system works correctly without causing disruptions.
Here's a step-by-step guide on how this gradual transition can be executed:
Pilot Selection:
Initial Implementation:
Testing Phase:
Incremental Expansion:
Training and Communication:
Full-Scale Implementation:
After successful phased implementations and when confident in the system's stability, you can proceed with a full-scale rollout.
Ensure that backup and recovery mechanisms are in place to revert to the old system if any unforeseen challenges arise.
Continuous Review and Refinement:
Even after a full transition, regularly review the role-based system to ensure it remains relevant and effective.Be sure to adjust roles or rules as necessary to cater to evolving business needs or to address any newly identified challenges.
Data owners would likely engage in a continuous review of roles and access, ensuring that as the business evolves, access controls evolve too, maintaining the principle of least privilege. They are key for initiatives like recertifications, where data owners validate that the existing access aligns with current needs and adjust accordingly.
Remember, the key to a successful gradual transition lies in meticulous planning, continuous feedback, rigorous testing, and open communication. By implementing in phases, you can identify and address challenges on a smaller scale before they become widespread issues.
There are two utilities in ACF2 that can help us during this phase:
The TEST Subcommand
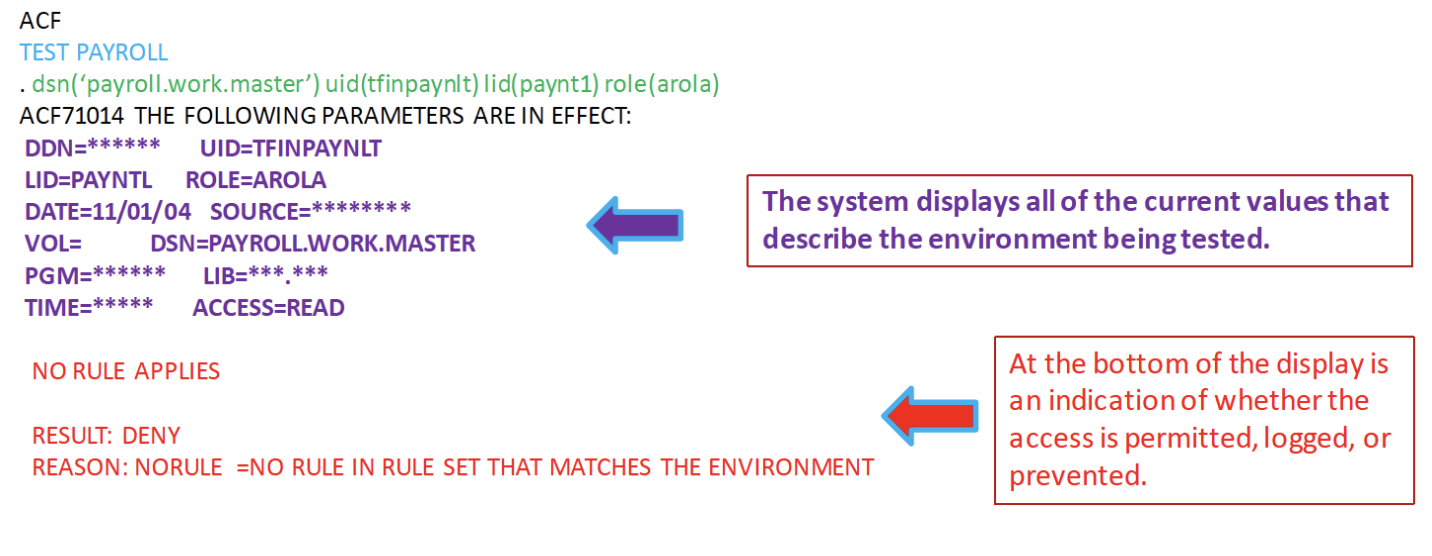
The TEST subcommand lets you interactively test a compiled rule set. Testing determines whether the rule set allows the access you intended. When you specify the TEST subcommand, ACF2 performs a validation of the compiled rule but does not create any loggings for violations. The TEST subcommand checks the test rule against the current rules in a directory; you might have to store the rule and rebuild the directory before testing to get accurate results for the test.
After you enter the TEST subcommand keywords, the system displays all of the current values that describe the environment being tested. For example, the following keywords test whether the access rule set PAYROLL lets the user TFINPAYNLT access the data set:

The Access Subcommand
The ACCESS subcommand simulates validation for users that match the UID mask, ROLE, or USER on each matching rule line.
The following example shows how the ACCESS subcommand is used:
ACF
access dsname(‘public.jcllib’) ← Specify the access to be checked
$KEY(PUBLIC) ← Rule found
Logonids with access to: PUBLIC.JCLLIB
USER04 READ, WRITE
USER02 READ, WRITE
ALL LIDS READ
Logonids prevented access to: PUBLIC.JCLLIB USER07 USER09
X-ROL Records
Cross-reference role group (X-ROL) records lets you implement role-based security at your site. You can assign users to roles and assign accesses that are based on those roles. Roles can also be grouped into role groups. Both roles and role Groups can be specified in data set and resource rules.
The data set or resource rule is created or modified by entering the X-ROL record name in the new role field in place of the UID string in the rule lines
During access validation on a roleset rule, the first role in a user’s table is used for validation against the rule line. If the user is not granted access by a rule line from this role, the next role from the table is used and validation of the rule starts over. This process continues until access is allowed or the user’s table of roles is exhausted, when access is denied. Loggings are reported on the active role.
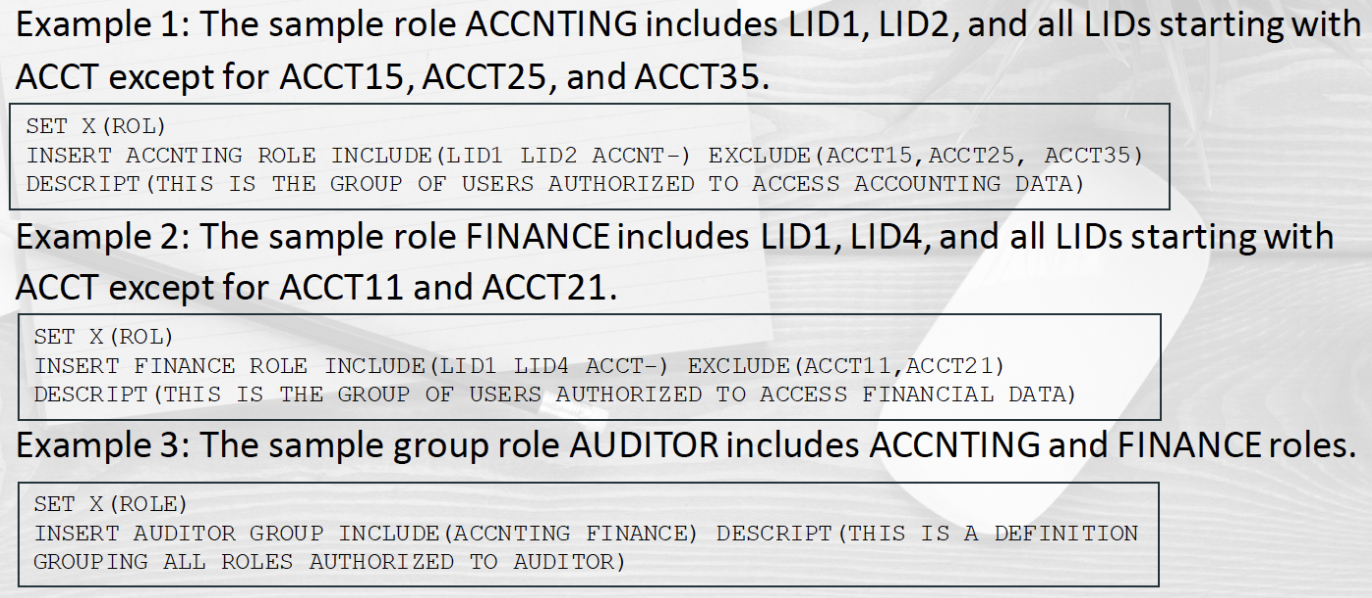
The general structure for defining an role would look something like this:

In the following examples we can see how to create different types of Roles and how to add hundreds or thousands of users in a single command using masks.

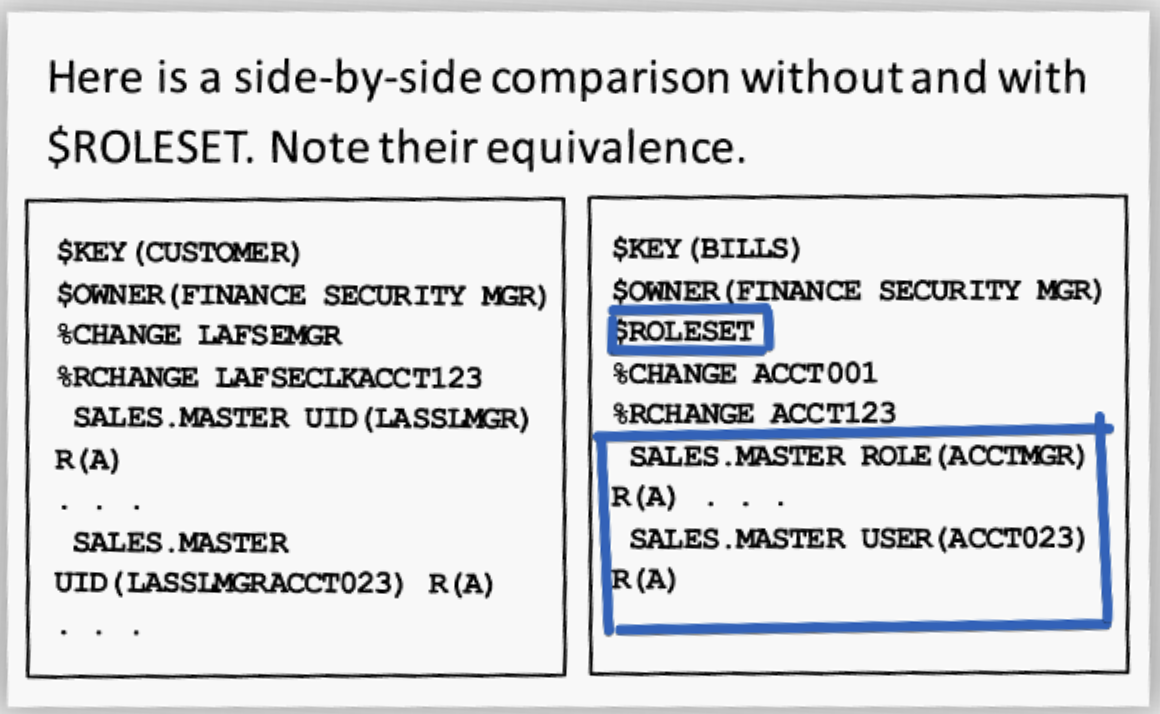
ACF2 Rules: UID VS Role
Access rules outline the specific circumstances or settings under which certain data sets can be accessed, deciding if a user or a collective group can or cannot gain access. On the other hand, resource rules lay out the specific conditions for gaining access to distinct resources. These resources encompass elements like TSO accounts, procedures related to TSO, IMS-related elements, commands, and CICS-related files and data, among others. They also include system elements guarded by SAF calls and any other resource the organization wishes to specify.
In ACF2, the distinction between rules using the UID String and those using X-ROL is foundational to how access control is managed. Here's a breakdown of the differences:

Who the rule applies to:
$Key(high-level-index): $KEY is the only required control statement.Specifies the high-level index of the data set name for which this rule is being written or the VSAM key of the rule set. You can specify one- to eight-characters. For example, when you compile a rule set to permit access to the data set SYS1.PARMLIB, the $KEY control statement contains $KEY(SYS1), because SYS1 is the high-level (or first) index of the data set name. This field cannot be masked.
UID(LASSLMGRACCT023): This UID mask can represent any UID that begins with the letters LASSLMGRACCT023 and ends with up to 9 characters. (A valid UID can contain up to 24 total characters.) A UID mask can be defined by omitting ending characters, by using asterisks (*), or by using a dash (-).
$Roleset: Designates this rule set as a role rule set that must contain role parameters in rule line entries. UID parameters are NOT allowed in this rule set. ROLE and USER are valid parameters on roleset rule line entries.
ROle(role): Specifies the name of an X(ROL) record to indicate the users for whom this rule entry applies. If you specify ROLE(-), the entry applies to all users of the system. Masks other than ROLE(-) are not allowed. During access validation on a Roleset rule, the first role in the list is used for validation. If access is denied, the next role in the list is selected and validation is redriven. This process continues until access is allowed or the user's list of roles is exhausted.
ROLE cannot be used in non-$ROLESET rules.
USer(logonid): Specifies a logonid to indicate the particular user for whom this rule entry applies. If you specify USER(-), the entry applies to all users of the system.
%CHANGE and %Rchange are used to delegate rule set administration.
Using NEXTKEYs with $ROLESET Rules
In ACF2, you have the flexibility to blend both $ROLESET rules and the traditional UID rules within the same NEXTKEY path. This means that while migrating towards a $ROLESET-based system, you don't need to make an abrupt transition and upend your entire existing setup. Instead, you can incrementally introduce $ROLESET rules while still retaining and functioning with the traditional UID-based rules.
The NEXTKEY parameter directs ACF2 to evaluate an alternate access rule set when a particular environment applies to the access, but the access is prevented. ACF2 only checks the NEXTKEY parameter when the access matches the environment, but the rule prevents the access.
When using the NEXTKEY parameter in a ROLESET rule, the same ROLE has to match throughout the NEXTKEY chain. Higher level rules could use ROLE(-) since ROLE(-) will match any role. ROLE(-) will also match for logonids that have no roles.
During access validation on a $ROLESET rule, the first role in the user’s list of roles is used for validation. If access is denied, the next role in the list is selected and validation is re-driven, possibly taking a different NEXTKEY path. This process continues until access is allowed or the user’s list of roles is exhausted.
If you have questions about this process, please feel free to reach out to me at jose.arias@broadcom.com.
 Copyright © 2005-2025 Broadcom. All Rights Reserved. The term “Broadcom” refers to Broadcom Inc. and/or its subsidiaries.
Comments